D
Built BY a Dentist, FOR Dentists
Dentospire™
Complete User Guide
Step-by-Step Walkthrough & Feature Showcase
- 1Getting Started7
- 2Dashboard Overview9
- 3Register a New Patient11
- 4Patient Records & Search13
- 5Dental Chart & Findings15
- 6SOAP Notes & Voice-to-SOAP™17
- 7AI X-ray & Image Analysis19
- 8AI Diagnosis & Prescription22
- 9Appointments & Calendar24
- 10Patient Self-Booking™26
- 11Billing & Invoices28
- 12Lab Management30
- 13AI Case Publisher™ & Community32
- 14Reports & Analytics34
- 15Treatments & Treatment Plans36
- 16Quick Mode™10
- 17Prescriptions9
- 18Finance & Revenue Analytics42
- 19Smart Inventory44
- 20Supplier Ordering46
- 21AI Analytics — 7 Modules48
- 22Consent Forms9
- 23Staff Permissions54
- 24Communication & Email Automation56
- 25Festival Greeting Cards63
- 26Auto Google Reviews65
- 27Dentospire Points (Retired)67
- 28Quotations69
- 29Interest Lists71
- 30Salary Management73
- 31Maintenance Tracking75
- 32Visiting Doctor System77
- 33Settings & Configuration79
- 34Backup & Restore81
- 35Multi-Language Support83
- 36Support, Mobile & More85
- 37Pricing Plans87
- 38Queue → Quick Mode89
- 39Collect Payment Prompt91
- 40Visit Summary93
- 41Lab Records — Editable + Two-Way Sync95
- 42AI Bill Archive & Auto-Expenses97
- 43Unified Add/Edit Treatment Forms99
- 44Bills Page97
- 45Supplier Enhancements103
- 46Watchlist (Patient Categories)105
- 47AI Chatbot — "Ask Me"107
- 48Enhanced Voice Correction & AI Redundancy109
- 49Search in Procedure Picker111
- 50Convert Quotation → Invoice113
- 51Ctrl+K Global Patient Search115
- 52Keyboard Shortcuts117
- 53Repeat Rx & Auto-Save Drafts119
- 54Rx Instruction Quick-Pick121
- 55AI Chatbot Deep Knowledge123
- 56Multi-Language Voice Input84
- 57Recently Added127
- 58Periodontal Charting by Voice127
- 59Patient Portal133
- 60Your Clinic’s Own Website128
- 61Patient Education Library137
- 62Pain Triage & Chairside Capture139
- 63Instalment Plans for Long Treatments141
- 64Move Your Old Data In Yourself143
- 65Troubleshooting145
How to Use This Guide
- Each section has numbered steps you can follow along.
- Look for PRO TIP boxes for shortcuts.
- Look for AI FEATURE boxes for AI capabilities (Created by Dentospire AI).
- Look for the ℹ️ info icon on every page in the app for instant feature help.
- Click Save as PDF (top-right) to download.
™ Dentospire, Voice-to-SOAP™, AI Case Publisher™, AI Autosuggest™, Voice Registration™, Quick Upload™, Smart Alerts™, Chart-to-SOAP™, Voice Search™, Quick Mode™, and Patient Self-Booking™ are trademarks of Dentospire. Trademark application accepted.
dentospire.com/sign-in
DENTOSPIRE™
Sign Up
1
Visit dentospire.com
Open browser, go to dentospire.com. Click Start Free or Sign In.
2
Enter Your Email
Type email. You get a one-time code (OTP). No password needed!
3
Enter OTP Code
Check inbox for 6-digit code. Enter it. You are logged in!
4
Complete Profile
Set clinic name, degree, specialization, photo. Appears on invoices.
PRO TIP
Passwordless login — never remember a password. Just email + OTP each time.
Free Plan Includes
- 200 patients — no time limit
- Full dental charting (44 conditions)
- GST billing and invoices
- Appointments and calendar
- Self-booking portal
- SOAP notes, prescriptions, consent forms
Login Security — Rate Limiting
1
Brute-Force Protection
Dentospire protects your account with login rate limiting. After 5 failed login attempts, the account is temporarily locked for 15 minutes.
2
Automatic Unlock
After 15 minutes, the lockout expires and you can try logging in again. This prevents unauthorized access while keeping the experience simple for genuine users.
PRO TIP
If you are locked out, wait 15 minutes and try again. Use the correct email address registered with your Dentospire account. OTP login means no passwords to guess — rate limiting adds an extra layer of security.

Dashboard with Smart Alerts (Light Mode)
Dashboard Cards
📅
Today's Appointments
Patients scheduled today. Click to jump to calendar.
💰
Revenue Cards
Daily/monthly collection, outstanding — real time.
👥
Patient Count
Total and new patients this month.
⚡
Quick Actions
Add patient, create appointment, generate invoice.
Navigation
1
Sidebar
The sidebar organizes features into logical groups with the most-used items visible at the top. Clinical shows 5 items upfront (Treatments, Imaging, Prescriptions, Lab, Consent Forms) with 9 more under a “More” toggle. Finance shows 4 items upfront (Payments Received, Invoices, Reports, Expenses) with 5 more under “More”. Other sections: Dashboard, Patients, Calendar, Community, Settings.
2
Doctor Selector
Multiple doctors? Switch views with dropdown.
3
Profile %
Fill degree, specialization, address, photo for 100%.

Dashboard with Smart Alerts (Dark Mode)
PRO TIP
Dashboard greets you by time of day and shows upcoming appointments.
SMART ALERTS™
Dashboard shows AI-powered alerts: revenue insights, overdue treatments, pending payments, recall due patients. Auto-generated daily.
Quick Mode™
Complete a patient visit in 60 seconds:
- Patient → Visit → Treatment → Payment → Rx → Done
- One-screen workflow — no page switching
dentospire.com/patients/new
📈👥📅🦷💳🔬📊🌐⚙
Register New Patient
Name: Rahul Sharma
Age: 32 • Male
Phone: +91 98765 43210
Email: rahul@email.com
Address: 42 MG Road, Pune
Save Patient🎤 Voice Register
DENTOSPIRE™
Manual Registration
1
Click Add Patient
From Patients page or Dashboard.
2
Fill Details
Name, Age, Gender, Phone, Email, Address. Only Name+Phone required.
3
Medical History
Optionally add allergies, conditions, medications.
4
Save
Patient registered! Taken to profile.
Voice Registration™ AI
1
Click Microphone
On registration form, click mic button.
2
Speak Details
Say: Rahul Sharma, age 32, male, phone 98765 43210, Pune
3
AI Fills Form
All fields filled automatically. 20 languages (13 Indian + 7 international).
4
Review & Save
Check data, correct if needed, save.
AI FEATURE — Voice Registration™
Speech recognition fills entire form. Understands names, ages, phones — even mixed Hindi-English.
dentospire.com — Patient Profile
📈👥📅🦷💳🔬📊🌐⚙
RM
Rahul Mehta Settled
ID: DNDC-260301-042 · Male · 32 yrs · 📞 98765 43210
EditShare Case
OverviewClinicalInvoicesLab WorkDocumentsAI
| Treatment | Date | Doctor | Status | Fees |
|---|
| Root Canal #11 | Mar 08, 2026 | Dr. Priya | Completed | ₹8,000 |
| Crown Fitting #36 | Feb 28, 2026 | Dr. Priya | Completed | ₹6,500 |
| Scaling & Polish | Jan 20, 2026 | Dr. Amit | Completed | ₹2,000 |
DENTOSPIRE™
1
Search
Type name, phone, or ID. Instant filter.
2
Open Profile
Click patient → overview, clinical, invoices, lab, documents, AI tabs.
3
View History
All visits, treatments, payments. Color-coded status.
AI Feature — AI Smart Search
Type partial names, mixed Hindi-English. AI finds best matches instantly.
Pro Tip
Use
Voice Search™ to find patients by speaking their name.
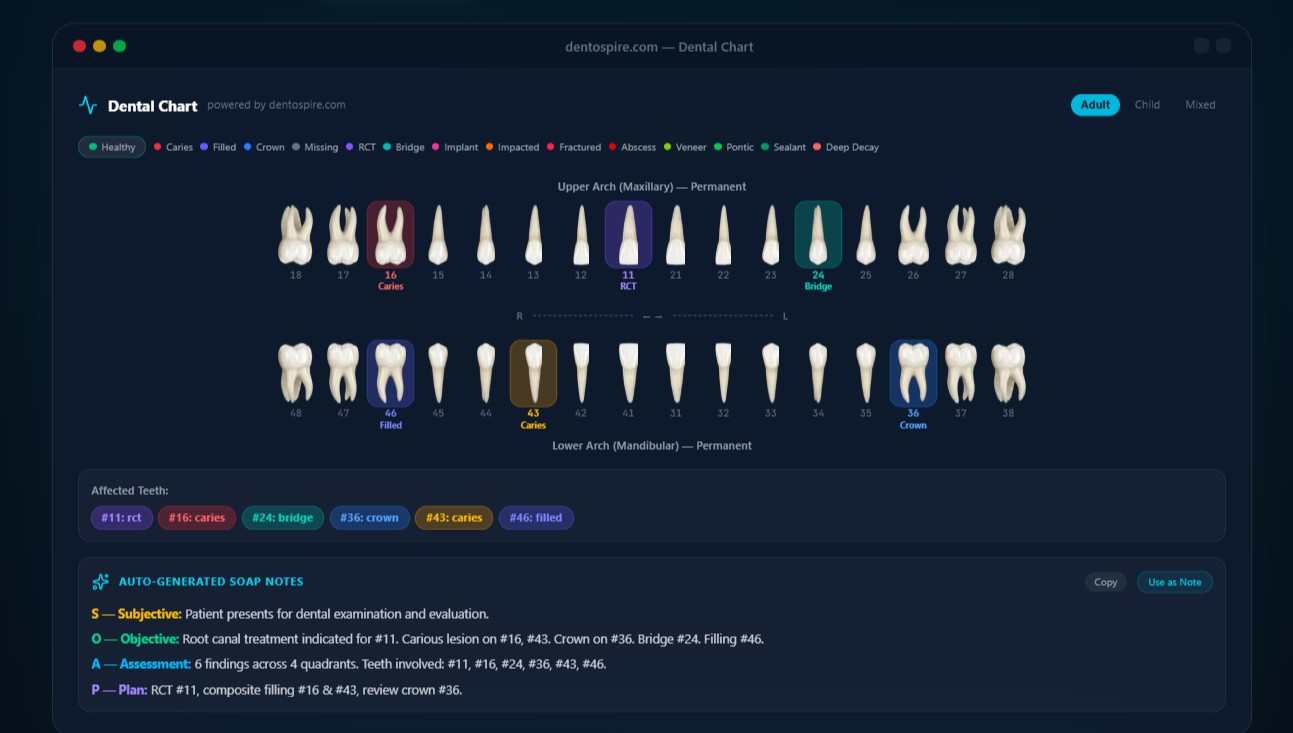
Dental Chart — 32 teeth, color-coded conditions, Auto-Generated SOAP Notes
1
Open Chart
Patient profile, Dental Chart tab. 32 photorealistic teeth.
2
Click Tooth
Panel with 44 conditions: Caries, RCT, Crown, Extraction, etc. Findings are smart-sorted by clinical frequency (Pain, Caries, Sensitivity at top). Procedures sorted by usage + clinical priority.
3
Mark Surfaces
M, O, D, B, L surfaces. G.V. Black classification. Surface selector works for findings (caries, decay, fractured, erosion, sensitivity, abrasion) and procedures (filled, crown, veneer, sealant, composite, GIC, inlay, onlay).
4
Multiple Findings
One tooth: caries + crown + RCT. All tracked separately.
5
Auto SOAP
Findings auto-generate SOAP notes — grouped by quadrant. SOAP recalculates automatically when chart changes. Zone-based findings (Q1-Q4, General/Oral) show zone labels instead of tooth numbers.
AI Feature — Chart-to-SOAP™
Every chart finding auto-generates structured SOAP. Click 3 teeth → S,O,A,P sections written.
Dental Chart v3 — Multi-Condition Charting
1
Drag Conditions to Teeth or Zones
Select a condition from the panel and drag it directly onto a tooth or a Quadrant Zone (Q1-Q4). Non-tooth findings like leukoplakia, TMJ disorder, bruxism, and mucocele can be placed on zones or the General/Oral area. Multiple conditions can be stacked on a single tooth — e.g., Caries + Crown + RCT on the same tooth.
2
Drag-Drop Surfaces
Drag conditions to specific surfaces (M, O, D, B, L) for precise charting. The surface highlights as you hover, and the condition snaps into place on drop.
3
Concurrent Edit Protection
If another doctor or staff member is editing the same patient's chart, the system locks the chart and shows a notification. This prevents conflicting edits and data loss in multi-doctor clinics.
Pro Tip
Use Adult/Child/Mixed toggle for pediatric patients. Color-coded conditions on each tooth. Drag-drop charting is the fastest way to record findings — no clicking through menus.
dentospire.com/patients/P-001/clinical
📈👥📅🦷💳🔬📊🌐⚙
SOAP Notes
S: Pain in lower right molar for 3 days, worse on chewing
O: Deep caries #46 (MOD), positive cold test, percussion tender
A: Irreversible pulpitis #46 with periapical periodontitis
P: RCT #46, pulpectomy today, obturation next visit
🎤 Voice-to-SOAP™Save
DENTOSPIRE™
Auto SOAP from Chart
1
Mark Findings
Click teeth, select conditions. SOAP auto-generates.
2
Edit
Notes are editable. Add details.
Voice-to-SOAP™ AI
1
Open Treatment
Patient profile → Add Treatment.
2
Click Mic
In clinical notes, click microphone.
3
Speak
Pain in lower right molar 3 days. Deep caries 46. Advised RCT.
4
AI Converts
Speech becomes structured S, O, A, P automatically.
AI FEATURE — Voice-to-SOAP™
Speak in English, Hindi, or mixed. AI converts to structured SOAP.
PRO TIP
Combine: chart (Objective) + voice (Subjective & Plan). Done in 30 seconds.
dentospire.com/patients/P-001/files
📈👥📅🦷💳🔬📊🌐⚙
AI Image Analysis™
AI Findings:
• Periapical radiolucency #36
• Deep caries #46 near pulp
• Mild bone loss #35-37
Add to SOAP
DENTOSPIRE™
1
Open Files
Patient profile → Files tab.
2
Upload
Quick Upload™ — camera or file. JPEG, PNG.
3
AI Analyse
Click AI Analyse below image. YOLO prescreen logging tracks detection confidence. Bbox validation ensures accurate overlays. Image size warning shown for oversized uploads.
4
Review AI Findings
AI detects 6 pathologies — Caries, Periapical Lesion, Impacted Tooth, Restoration, Implant & Bone Loss — in seconds.
5
Add to SOAP
Copy findings into clinical notes.
AI FEATURE — Self-Improving X-Ray AI
Dentospire’s dual
YOLO + Gemini pipeline detects
6 dental pathologies — Caries, Periapical Lesion, Impacted Tooth, Restoration, Implant & Bone Loss — with
86.7% detection accuracy that improves with every dentist correction.
India’s first dental software with built-in AI that learns from clinical practice.Bbox Correction UI — Train the AI
1
Edit Boxes
After AI analysis, click Edit Boxes to enter correction mode. All bounding boxes become editable on the X-ray.
2
Confirm Correct Findings
Click the ✓ button on any correct detection to confirm it, or use Confirm All to approve every finding at once.
3
Move & Resize Boxes
Drag any incorrect bounding box to reposition it. Resize by dragging the edges or corners for precise alignment.
4
Draw New Boxes
Missed a finding? Draw a new box on the X-ray and pick from the 6-class category picker (Caries, Periapical Lesion, Impacted Tooth, Restoration, Implant, Bone Loss).
5
Delete False Positives
Click the × button on any incorrect detection to remove it from the results.
6
Your Corrections Are Kept
Corrections are stored against your clinic and can be fed back to the AI as examples on later scans. They stay within your clinic — nothing is shared with other clinics, and no model is retrained on your data.
PRO TIP
The more corrections you provide, the smarter the AI becomes. Even confirming correct detections helps the model learn.
AI FEATURE — India’s First
Dentospire is
India’s first dental software with built-in AI that learns from real clinical practice — every correction makes the system smarter for all users.
Dental Imaging Viewer
1
Upload X-rays
Patient profile → Files tab. Upload IOPA, OPG, CBCT, or clinical photos via Quick Upload™ (camera or file). Tag each image with type and tooth number for easy filtering.
2
Open the Viewer
Click any uploaded image to open the full-screen dental imaging viewer with a professional diagnostic toolbar.
3
Viewer Controls
Use the toolbar to zoom in/out, pan across the image, adjust brightness and contrast, invert colors (negative view), and rotate the image for optimal viewing angle.
4
Filter by Type & Tooth
Filter the image gallery by image type (IOPA, OPG, Clinical Photo) or by tooth number. Quickly find the exact X-ray you need from a patient's history.
5
AI Analysis
Click AI Analyse on any image. The dual YOLO + Gemini pipeline detects 6 pathologies with bounding boxes. Click Edit Boxes to correct, confirm, or add findings — all corrections feed back into the self-improving AI pipeline.
PRO TIP
Use
invert mode to switch between positive and negative views — some pathologies are easier to spot in inverted X-rays.
PRO TIP
Quick Upload™: camera opens instantly during exam. Tag images immediately for organized records.
dentospire.com/patients/P-001/clinical
📈👥📅🦷💳🔬📊🌐⚙
AI Autosuggest™
Assessment: Irrevers|
✔ Irreversible Pulpitis
Irreversible Pulpitis with Periapical Abscess
Irreversible Pulpitis (chronic)
Prescription
| Medicine | Dose | Freq | Days |
|---|
| Amoxicillin 500mg | 1 tab | TID | 5 |
| Ibuprofen 400mg | 1 tab | SOS | 3 |
DENTOSPIRE™
AI Diagnosis
1
Type Symptoms
In Assessment field, start typing.
2
AI Suggests
Diagnoses ranked by relevance as you type.
3
Select
Click suggestion to auto-fill.
Prescriptions
1
Open Section
Scroll to Prescription.
2
Search
39+ dental medicines with pre-filled dosage.
3
Add
Multiple medicines. Adjustable dosage, frequency, duration.
4
Print/Share
Branded PDF. WhatsApp or print.
AI FEATURE — Autosuggest
Real-time diagnosis suggestions. Ranked by clinical relevance.
dentospire.com/book/demo-clinic
DENTOSPIRE™
1
Get Your Booking Link
Go to Settings → Profile. Your clinic's shareable booking link is shown at the top: dentospire.com/book/your-clinic. A "Paused" badge appears if bookings are disabled.
2
Copy, Share or Preview
Use Copy to copy the URL, Share via WhatsApp to send it straight to a patient, or Preview Page to see exactly what patients will see.
3
Patient Books
Doctor → Date → Slot → Name & Phone → Confirm. 30 seconds.
4
Calendar
Booking appears in Dentospire + your clinic's Google Calendar.
Patients See
- Clinic name, address, doctor photos
- Available slots only (respects hours & leaves)
- Simple form: name, phone, time
- Confirmation message
PRO TIP
Add to
Google Business and WhatsApp. Self-bookers 3x less no-show.
dentospire.com/invoices/INV-2847
📈👥📅🦷💳🔬📊🌐⚙
Invoice #INV-2847
Priya Sharma • 10 Mar 2026
| Item | Qty | Rate | Amount |
|---|
| Root Canal Treatment | 1 | ₹8,000 | ₹8,000 |
| Ceramic Crown | 1 | ₹5,000 | ₹5,000 |
| X-ray (IOPA) | 2 | ₹200 | ₹400 |
Sub: ₹13,400 + GST 18%: ₹2,412₹15,812
Download PDFRecord Payment
DENTOSPIRE™
1
Create
Patient profile or Invoices page.
2
Add Items
Description, Qty, Rate, Amount. Auto-calculates.
3
GST
Toggle on/off. Automatic CGST+SGST split. Professional GST invoices.
4
Payments
Full or partial. Cash, Card, UPI, Bank.
5
PDF
Download branded invoice with logo.
📈
Revenue
Per doctor, treatment, month.
📤
Export
CSV/Excel. Filter by date, doctor.
PRO TIP
Partial payments for ongoing treatments. Balance auto-updates.
UPI Payment Links
1
Generate UPI Link
On any invoice, click Send UPI Link. Dentospire generates a UPI payment link with the exact invoice amount pre-filled.
2
Share via WhatsApp
The UPI link is sent to the patient's phone via WhatsApp. The patient taps the link, opens their UPI app (GPay, PhonePe, Paytm), and pays instantly.
3
Payment Recorded
Once paid, record the payment on the invoice as GPay-UPI. The patient's balance updates automatically.
Insurance & Claims
1
Add Insurance Policy
Open a patient's profile → Insurance tab. Click Add Policy. Enter the insurance provider name, policy number, coverage amount, validity dates, and plan type.
2
Submit a Claim
After completing a treatment, go to the patient's Insurance tab and click Submit Claim. Select the treatment, attach the invoice, and enter the claim amount. The claim is created and linked to the patient's policy.
3
Track Approvals
Each claim goes through statuses: Submitted → Under Review → Approved or Rejected. Update the status as you receive responses from the insurer.
4
Record Settlement
When the insurance company settles the claim, record the settlement amount and date. The payment is linked to the patient's invoice and balance updates automatically.
Insurance Features
- Multiple policies — a patient can have more than one active policy
- Claim history — full audit trail of all claims submitted, approved, and settled
- Coverage tracking — see remaining coverage balance for each policy
- Linked to billing — insurance payments integrate with your finance reports
dentospire.com/lab
📈👥📅🦷💳🔬📊🌐⚙
Lab Orders
| Patient | Type | Lab | Status | Due |
|---|
| Priya S. | PFM Crown | Apex Lab | In Progress | Mar 14 |
| Amit K. | Zirconia | Apex Lab | Sent | Mar 16 |
| Neha R. | Denture | Star Dental | Ready | Mar 10 |
| Rajesh P. | Post Core | Apex Lab | Delivered | Mar 8 |
+ New Lab Order
DENTOSPIRE™
1
Create Order
Send to Lab. Select lab, type, material.
2
Track
Sent → In Progress → Ready → Delivered.
3
Auto-Invoice
Lab costs added to patient invoice.
4
Reports
Monthly PDF: work, costs, breakdowns.
Lab Features
- Multi-lab — track multiple labs
- Due dates — overdue highlighted
- Costs — monthly per-lab totals
- Patient linking — order to patient
- PDF — for accounting
AI Bill Auto-Scan AI
AI FEATURE — Powered by Gemini 2.0 Flash
Upload a photo or PDF of any lab bill. AI automatically extracts lab name, test name, charges, date, and findings — then auto-fills the Lab Record form. No manual data entry.
1
Open New Lab Record
Go to Clinical → Lab Records → New. You will see the Scan Lab Bill button at the top.
2
Upload Bill
Click Scan Lab Bill and upload a photo (JPG/PNG/WebP) or PDF of the lab bill. Supports files up to 20 MB.
3
AI Extracts Data
Gemini 2.0 Flash AI reads the bill and extracts: lab name, test/work type, charges, date, and findings. All fields auto-fill in the form.
4
Review & Save
Review the auto-filled data, make any corrections, and save the lab record. Use the Re-scan button if you need to try a different image.
PRO TIP
Set
expected dates. Overdue items show in red. Use
AI Bill Scan to eliminate manual entry from lab bills — just snap a photo and let AI do the rest.
dentospire.com/community
📈👥📅🦷💳🔬📊🌐⚙
Community — Case Gallery
Complex RCT with Post & Core • Endodontics
By Dr. Demo • Mar 8 • ❤ 24 • 2 images
Full Mouth Rehab • Prosthodontics
By Dr. Patel • Mar 6 • ❤ 18 • 4 images
Impacted Wisdom Tooth • Oral Surgery
By Dr. Rao • Mar 5 • ❤ 31 • 3 images
AI Case Publisher™
DENTOSPIRE™
Publish Case AI
1
Open Treatment
Any completed treatment.
2
Publish Case
Select from 11 specialties.
3
AI Writes
Anonymized case study generated.
4
Images & Publish
Up to 4 images. Review, publish.
Share Case from Patient Profile
1
Open Patient Profile
Navigate to any patient's profile page. Click the More menu (three dots) in the top-right corner.
2
Click Share Case
Select Share Case from the dropdown. This opens the AI Case Publisher with the patient's clinical data pre-loaded.
3
AI Generates Case Study
AI automatically writes a structured, anonymized case study from the patient's treatment history, findings, and outcomes. Patient identity is completely removed.
4
Add Images
Attach up to 4 clinical images (before/after photos, X-rays). Images are displayed alongside the case narrative.
5
Publish & Share
Review, edit if needed, and click Publish. Your case appears in the Dentospire Community. Share directly to WhatsApp, Twitter, Facebook, and LinkedIn with one click.
Community
🌐
Browse
Cases by other dentists. Filter by specialty.
🔗
Share
WhatsApp, Twitter, Facebook, LinkedIn.
AI FEATURE — Case Generation
AI writes structured case study. Patient anonymized. 11 specialties.
dentospire.com/reports
📈👥📅🦷💳🔬📊🌐⚙
Revenue Analytics
Top Procedures
DENTOSPIRE™
1
Revenue
Daily/monthly, collection vs outstanding, per-doctor.
2
Treatments
Most performed, value, completion rates.
3
Patients
New vs returning, demographics, lifetime value.
4
Appointments
Busy times, no-shows, wait times.
5
Comparison
Side-by-side: months, doctors, treatments.
📊
Charts
Bar, line, pie — interactive.
📤
Export
Any report to CSV/Excel.
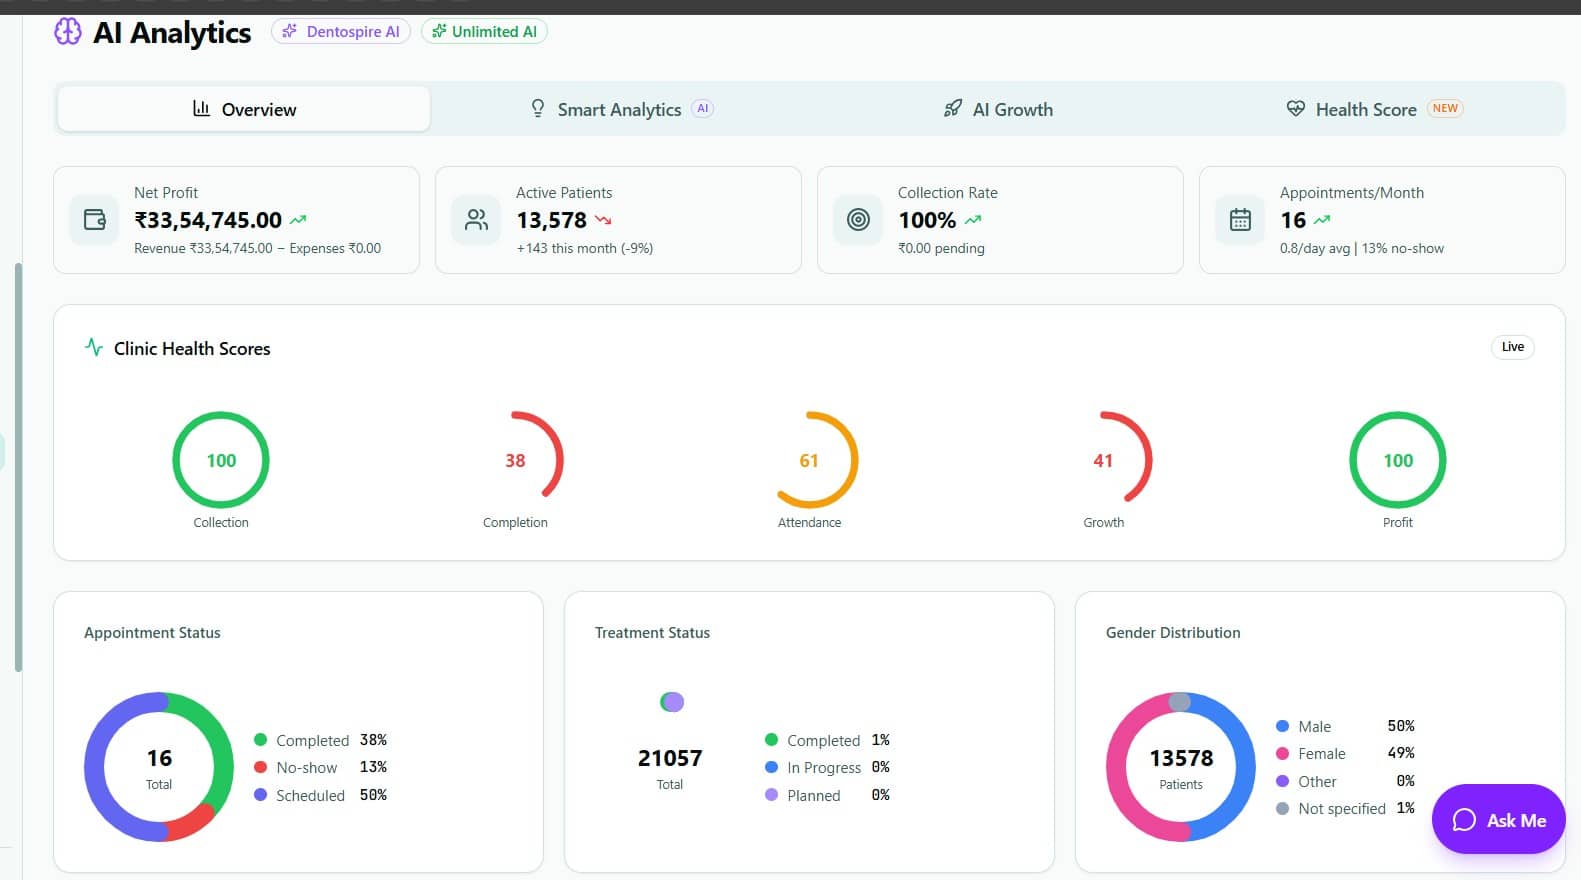
AI Analytics Overview — Revenue, Health Scores, Patient Distribution
PRO TIP
Monthly
Revenue Report.
Treatment Analytics for profitable procedures.
Treatment Procedures
1
Open Patient Profile
Navigate to a patient and open their Clinical tab.
2
Add Treatment
Click Add Treatment. Search or browse the procedure picker with built-in fees in ₹. Select teeth from the chart.
3
Set Status
Each treatment can be Planned, In Progress, or Completed. When the invoice is fully paid, the treatment auto-completes.
4
Priority & Notes
Set clinical priority (Urgent, High, Medium, Low). Add clinical notes per treatment.
Treatment Plan Templates
1
10 Built-in Templates
Pre-configured plans for common procedures like RCT, Crown, Full Mouth Rehab, etc.
2
Apply Template
Select a template — all treatments, fees, and tooth numbers auto-populate. Customize as needed.
3
Create Custom Templates
Save your own frequently used treatment combinations as reusable templates.
AI FEATURE — Created by Dentospire AI
Treatment Suggestions: Based on dental chart findings, AI suggests appropriate treatments with clinical priority. Suggestions are based on the doctor's history and 19 auto-treatment rules.
PRO TIP
Look for the
ℹ️ info icon on the treatments page for instant help. Treatments auto-complete when the linked invoice is paid — no manual status changes needed.
What is Quick Mode?
Quick Mode lets you add a treatment and record payment in a single screen — no navigating between tabs. Ideal for walk-in patients and quick procedures like cleanings, extractions, or check-ups.
1
Open Quick Mode
Click Quick Mode in the sidebar (lightning bolt icon). Select or search for a patient.
2
Select Treatment
Pick a procedure from the dropdown. Fee auto-fills from your procedure list. Select affected teeth.
3
Record Payment
Choose payment method: Cash, GPay-UPI, Card, or Bank Transfer. Enter amount paid.
4
Save & Done
One click saves: treatment record, invoice, payment entry, and updates the patient timeline. All in under 30 seconds.
What Quick Mode Creates Automatically
- Treatment record linked to the patient
- GST invoice with correct tax calculation
- Payment entry with selected payment mode
- Patient timeline entry
- Finance dashboard updates
PRO TIP
Use Quick Mode for high-volume days. Complete a walk-in patient's entire billing in
under 30 seconds. Look for the
ℹ️ info icon for quick help.
Creating a Prescription
1
Open Prescriptions
From a patient profile, click the Prescriptions tab. Or use the sidebar Prescriptions page for all prescriptions.
2
Add Medicines
Search from the built-in database of 39 dental medicines. Auto-fills dosage, frequency, and duration.
3
Use Templates
Save common prescription combos as templates (e.g., “Post-RCT”, “Post-Extraction”). One-click apply.
4
Download PDF
Generate a branded prescription PDF with your clinic logo, doctor name, degree, and registration number.
AI FEATURE — Created by Dentospire AI
AI Prescription Suggestions: Based on the diagnosis and dental chart findings, AI suggests appropriate medications with dosage. Review and approve with one click.
💊
39 Medicines
Pre-loaded dental medicines with dosage, frequency, and common use cases.
📄
Branded PDF
Professional prescription with clinic branding, letterhead, and doctor credentials.
PRO TIP
Create templates for your most common prescriptions. Apply with one click instead of adding medicines manually each time.
Revenue Analytics Dashboard
1
Open Finance
Navigate to Finance in the sidebar. The analytics tab shows revenue trends, collection rates, and outstanding amounts.
2
Revenue Charts
Interactive bar and line charts showing daily, weekly, monthly revenue. Compare periods side by side.
3
Collection Report
View every payment by day/month/year with treatment name, payment mode (Cash/GPay-UPI/Card/Bank Transfer), and totals.
Expense Tracking
1
Add Expenses
Track clinic expenses — rent, materials, salaries, utilities. Categorize each expense for reporting.
2
Expense Reports
View expense trends, category breakdown, and monthly summaries. Compare revenue vs expenses.
GST & Tax
💰
GST Rates
Support for 0%, 5%, 12%, 18%, and 28% GST. Auto-calculates CGST + SGST split.
📤
Export
Export invoices, payments, expenses to CSV and Excel. Finance privacy toggle (eye icon) hides amounts from staff.
PRO TIP
Use the
Finance Privacy toggle (eye icon) to hide financial data from staff screens. Only you see the numbers. Look for the
ℹ️ info icon for help.
Materials Management
1
Add Materials
Go to Clinical → Materials. Add dental materials with name, category, unit, cost price, and supplier info.
2
Set Reorder Thresholds
Define minimum stock levels. When stock drops below the threshold, you get an urgency badge alert.
3
Track Consumption
Record material usage per treatment. The system auto-deducts from stock and tracks consumption patterns.
Stock Management
1
Stock Overview
Go to Clinical → Stock. View all items with current quantity, reorder level, and urgency status.
2
90-Day Analysis
Smart analysis shows consumption trends over 90 days. Predicts when you will run out of each material.
3
Urgency Badges
Color-coded badges: Critical (out of stock), Low (below threshold), OK (sufficient).
PRO TIP
Set reorder thresholds for all materials. The urgency badges on the dashboard warn you
before you run out. Look for the
ℹ️ info icon on every inventory page.
Managing Suppliers
1
Add Suppliers
Go to Clinical → Suppliers. Add supplier name, contact, email, phone, and product categories.
2
Supplier Portal
Each supplier has a profile with order history, payment status, and contact details.
Purchase Orders
1
Create Order
Click New Purchase Order. Select supplier, add items from your materials list with quantities.
2
Share via WhatsApp
Click the WhatsApp button to send the purchase order directly to your supplier. Pre-formatted message with all items and quantities.
3
Track Delivery
Mark orders as Ordered, Shipped, or Received. Stock auto-updates when you mark as received.
Built In, Not Bolted On
Supplier ordering is built into Dentospire rather than handled in a separate app or over the phone. WhatsApp share makes ordering as easy as sending a message.
AI FEATURE — Created by Dentospire AI
Dentospire AI analyzes your clinic data across 7 specialized modules to provide actionable insights. Available on Pro and Enterprise plans.
AI Analytics — Health Scores, Revenue, Appointments (Light Mode)
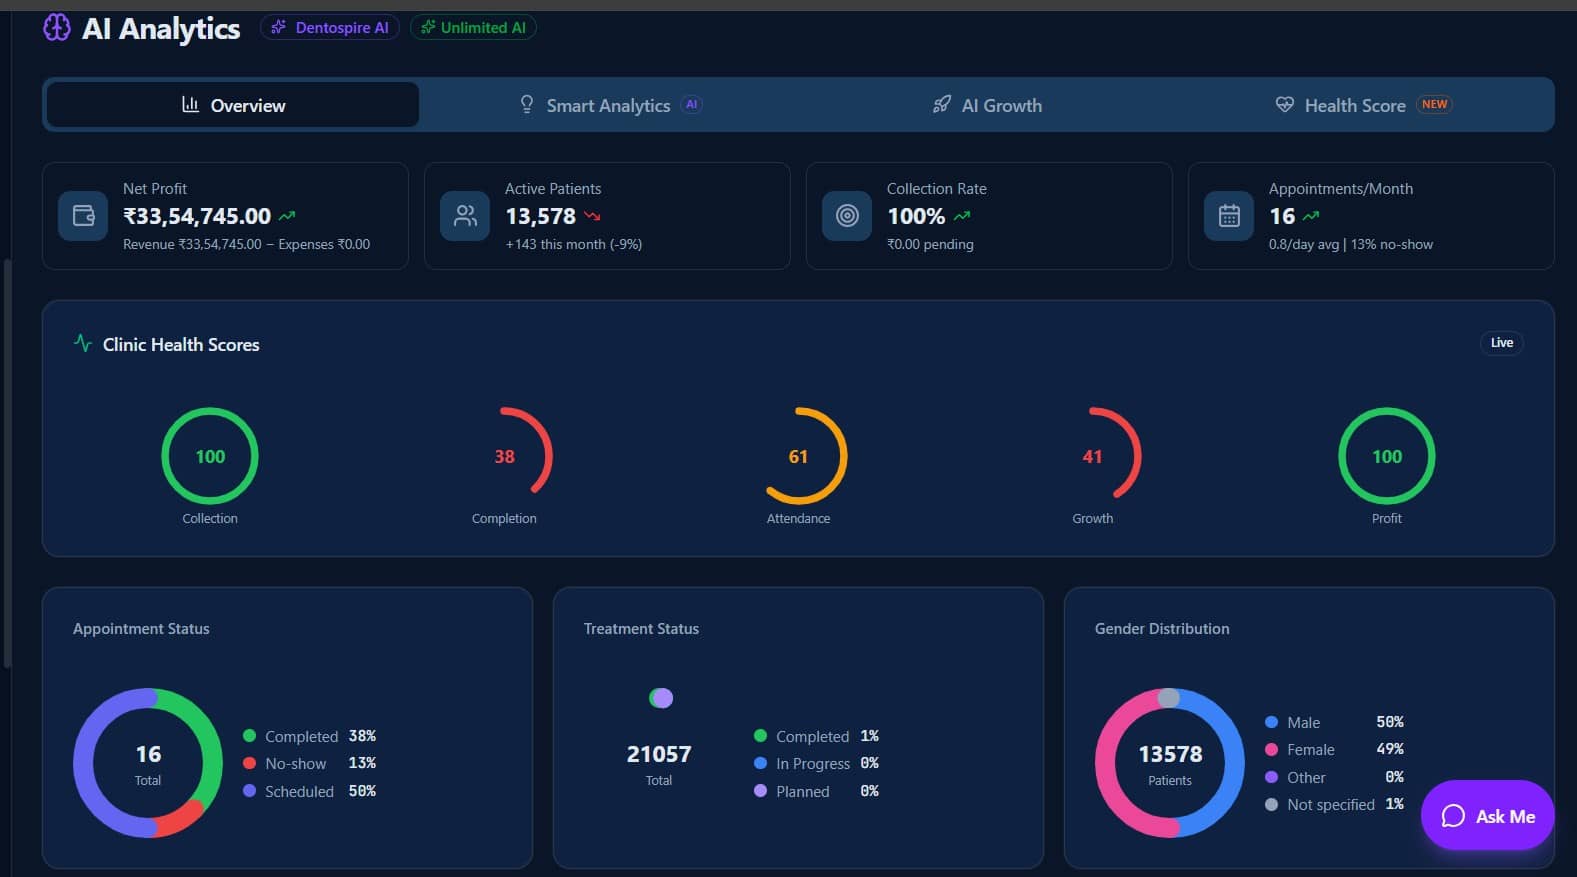
AI Analytics — Health Scores, Revenue, Appointments (Dark Mode)
📈
1. Growth Analytics
Patient acquisition trends, revenue growth rate, month-over-month comparisons, and growth predictions.
📊
2. Demand Analytics
Which treatments are most requested, peak demand periods, and underserved treatment areas.
📅
3. Scheduling Analytics
Optimal appointment slots, chair utilization rates, no-show patterns, and scheduling efficiency.
💬
4. Engagement Analytics
Patient return rates, follow-up compliance, communication effectiveness, and patient lifetime value.
🌞
5. Seasonal Analytics
Season-based treatment patterns, festival period planning, and revenue forecasting by quarter.
🧠
6. X-ray Analytics
AI X-ray usage trends, common findings distribution, detection accuracy tracking.
7. Risk Analytics
Identifies at-risk patients (overdue follow-ups, incomplete treatments), financial risks (high outstanding), and operational risks (low chair utilization). Proactive alerts help you act before problems grow.
PRO TIP
Check
AI Analytics weekly. The Growth and Risk modules help you make data-driven decisions about staffing, marketing, and patient outreach.
AI FEATURE — Created by Dentospire™ AI
Generate a premium, print-ready PDF report from your AI Analytics data. Navigate to
AI Analysis → Master tab and click the
“Export PDF” button. The report is fully anonymized — no individual patient names appear anywhere.
How to Export
1
Open AI Analysis
From the sidebar, navigate to AI Analysis. Select the Master tab to view the consolidated analytics dashboard.
2
Click “Export PDF”
Click the Export PDF button at the top of the Master tab. The report generates instantly from your live clinic data.
3
Download & Print
The PDF downloads automatically. Print-optimized with page breaks between sections — ready for board meetings, audits, or internal reviews.
What’s Inside the Report
📄
Cover Page
Dentospire™ branding, your clinic name, and the report generation date.
📊
Executive Summary
6 KPI cards at a glance: revenue, patients, treatments, collection rate, average invoice value, and appointments.
🏆
Health Score Banner
Overall clinic health grade (A+, A, B, C, or D) with gauge charts showing performance across key dimensions.
📈
Performance Scorecard
6 metrics with targets and visual progress bars — see exactly where your clinic stands vs. benchmarks.
📝
18 Numbered Sections
Comprehensive coverage of all clinic data: revenue, patients, treatments, scheduling, engagement, seasonal trends, risk factors, and more.
💡
Improvement Recommendations
Data-driven, priority-ranked recommendations generated by Dentospire™ AI to help you grow your practice.
Report Highlights
- Premium BI-style layout — professional formatting suitable for presentations and audits
- 6 Executive KPI cards — revenue, patients, treatments, collection rate, avg invoice, appointments
- Health Score with grade — A+ / A / B / C / D grading with gauge charts
- 18 numbered sections — covers every aspect of your clinic operations
- Performance Scorecard — 6 metrics with targets and progress bars
- Improvement Recommendations — data-driven, priority-ranked action items
- Fully anonymized — no individual patient names in the report
- Print-optimized — page breaks between sections for clean printing
- Dentospire™ branded — cover page with clinic name and date
PRO TIP
Export the AI Analytics PDF monthly for your records. Share it with partners or use it during team meetings to track clinic performance over time. The anonymized format makes it safe to share without exposing patient data.
Using Consent Forms
1
Open Consent Forms
From a patient profile, go to the Consent tab. Or access from the sidebar.
2
Choose Template
Select from 12 built-in templates: General Consent, RCT, Extraction, Implant, Orthodontics, Bleaching, Surgery, Crown & Bridge, Periodontal, Pediatric, Sedation, and Photography consent.
3
Patient Signature
Patient signs digitally on screen (works on tablet and phone). Touch or mouse signature capture.
4
Doctor Signature
Doctor counter-signs. Both signatures are timestamped and stored securely.
5
Download PDF
Generate and download a legally-formatted PDF consent form with both signatures, date, and clinic details.
Creating Custom Consent Forms
1
Open Form Builder
Go to Settings → Consent Forms. Click Create New Template to open the consent form builder.
2
Write Content
Enter the consent title, procedure description, risks, benefits, and alternatives. Use the rich text editor to format the content professionally.
3
Save Template
Save your custom template. It appears alongside the 12 built-in templates and can be used for any patient.
Digital E-Signatures
1
Patient Signs on Screen
Hand your tablet or phone to the patient. They sign directly on screen using touch or stylus. Works on any device with a touchscreen or mouse.
2
Doctor Counter-Signs
After the patient signs, the doctor adds their signature. Both signatures are timestamped with the exact date and time.
3
Stored Securely
Signed consent forms are stored digitally in the patient's profile. Access anytime from the Consent tab. No paper to lose or misfile.
4
Download & Share PDF
Generate a legally-formatted PDF with both signatures, date, clinic details, and full consent text. Share with the patient via WhatsApp or email.
Why Consent Forms Matter
- Legal protection — documented informed consent for every procedure
- Patient trust — transparent communication about risks and alternatives
- Compliance — meets Dental Council of India requirements
- Digital records — no paper to lose, always accessible
- E-signatures — legally valid digital signatures with timestamps
PRO TIP
Get consent
before every major procedure. Create custom templates for your specialized procedures. The PDF is timestamped and legally valid. Hand the patient a copy via WhatsApp or email.
Role-Based Access
1
Go to Settings → Staff
Add staff members with their email, role (Doctor, Receptionist, Assistant), and set individual permissions.
2
10 Permission Keys
Granular control over what each staff member can see and do. Toggle each permission on/off per staff member.
👥
Patient Access
Control who can view, add, or edit patient records and profiles.
💰
Finance Access
Hide financial data from non-authorized staff. Only owners see revenue numbers.
📅
Appointment Access
Allow staff to view/book appointments without seeing clinical details.
⚙
Settings Access
Restrict who can modify clinic settings, procedures, and system configuration.
Permission Examples
- Receptionist: View appointments, check-in patients, create invoices — cannot see clinical notes or financial dashboards
- Assistant: View patient charts, add SOAP notes — cannot access billing or settings
- Associate Doctor: Full clinical access, limited admin — cannot modify clinic settings
PRO TIP
Set up permissions
before adding staff. The dashboard is hidden from non-admin staff by default. Most granular permission system in Indian dental software.
Automated Email Types
Dentospire's cron engine runs 12 types of automated communications. Set them up once — they run forever.
📅
Appointment Reminders
Automated email reminders sent before appointments. Reduce no-shows by up to 40%.
💰
Payment Follow-ups
Auto-send payment reminders for outstanding balances. Gentle, professional templates.
📊
Daily Reports
Receive daily clinic summary — patients seen, revenue, appointments — via email every morning.
🎁
Birthday Wishes
Auto-send birthday greetings to patients. Personal touch that builds loyalty.
💬
Follow-up Reminders
After treatment completion, auto-schedule follow-up reminder emails.
🔬
Lab Status Updates
Notify patients when their lab work is ready for fitting.
⭐
Review Requests
Auto-send Google review links after completed appointments.
🙋
Welcome Emails
New patient registration triggers a welcome email with clinic info and booking link.
Additional Automation Types
- No-show follow-up — reach out to patients who missed appointments
- Treatment plan reminders — nudge patients with pending treatment plans
- Inactive patient re-engagement — bring back patients who haven't visited in 6+ months
- Festival greetings — auto-send branded festival cards (see Chapter 25)
PRO TIP
All emails are sent via
Resend (enterprise-grade delivery). Configure automation in
Settings → Communication. Look for the
ℹ️ info icon on each automation type.
Automated WhatsApp Messages LIVE
Dentospire integrates with the WhatsApp Cloud API for automated patient messaging using a prepaid credits system (like mobile top-up recharge). Each plan includes free WhatsApp messages: Starter = 200/mo, Pro = 1,000/mo, Enterprise = 5,000/mo. When free credits are used up, purchase top-up packs. Templates available in 20 languages. All messages display "Clinic Name | Phone Number" so patients always know who messaged them.
1
Appointment Reminders
Patients receive automated WhatsApp reminders before their appointment. Includes date, time, doctor name, and clinic address. Reduces no-shows significantly.
2
Payment Notifications
When a payment is recorded or an invoice is generated, the patient receives a WhatsApp message with the amount paid, balance remaining, and invoice summary.
3
Prescription Delivery
After creating a prescription, send the branded prescription PDF directly via WhatsApp. The patient receives the full prescription with medicines, dosages, and instructions.
4
Welcome Message on Registration
When a new patient is registered, a welcome message is automatically sent via WhatsApp to greet them and share clinic information. No manual action needed.
WhatsApp Credits & Top-Up Packs
1
Free Messages Per Plan
Each paid plan includes free WhatsApp messages every month: Starter = 200/mo, Pro = 1,000/mo, Enterprise = 5,000/mo. Free plan does not include WhatsApp messages.
2
Top-Up Packs (Prepaid Recharge)
When free credits run out, buy top-up packs like mobile recharge: ₹99/50 messages, ₹249/200 messages (best value), ₹499/500 messages, ₹999/1,500 messages. Razorpay payment gateway is pending (blocked on bank account — requires business bank account for KYC). Currently, credits are managed by the admin panel.
3
Credit Gating
When all credits (free + purchased) are exhausted, WhatsApp messages are blocked until you top-up or the next month’s free credits reset. This prevents unexpected charges.
4
Per-Clinic WhatsApp Toggle
Go to Settings → WhatsApp and use the ON/OFF toggle to enable or disable WhatsApp API messaging for your clinic. When OFF, only free wa.me links are available.
Admin Credit Management
1
Add or Remove Credits
From the Admin Panel, navigate to a clinic's WhatsApp settings. Use the Add Credits or Remove Credits controls to manually adjust the clinic's WhatsApp credit balance.
2
View Credit Balance
The admin panel shows the current credit balance for each clinic, including free plan credits and any purchased top-up credits.
3
Toggle WhatsApp Per Clinic
Admin can enable or disable WhatsApp for any clinic directly from the admin panel, without needing to access the clinic's own settings.
20 Language Template Support
1
Supported Languages
WhatsApp message templates are available in 20 languages: English, Hindi, Marathi, Tamil, Telugu, Kannada, Gujarati, Bengali, Malayalam, Punjabi, Odia, Urdu, Assamese, Spanish, Arabic, Portuguese, French, Indonesian, Turkish, and Thai. Patients receive messages in their preferred language.
2
Delivery Tracking
Track message delivery status in real-time: Sent, Delivered, and Read (blue ticks). See exactly which patients received and opened your messages.
Business Profile
1
Professional WhatsApp Presence
Your clinic’s WhatsApp Business profile is set up with your clinic logo, name, address, and contact information. Patients see a verified, professional profile when they receive messages from your clinic.
WhatsApp Cloud API Features
- Status: LIVE — fully operational with prepaid credits system
- Prepaid credits — like mobile top-up recharge, buy packs as needed
- Free messages per plan — Starter 200/mo, Pro 1,000/mo, Enterprise 5,000/mo
- Top-up packs — ₹99/50msg, ₹249/200msg, ₹499/500msg, ₹999/1,500msg
- 20 language templates — English, Hindi, Marathi, Tamil, Telugu, Kannada, Gujarati, Bengali, Malayalam, Punjabi, Odia, Urdu, Assamese, Spanish, Arabic, Portuguese, French, Indonesian, Turkish, Thai
- Credit gating — messages blocked when credits exhausted
- Per-clinic toggle — ON/OFF switch in Settings page
- Welcome message — auto-sent on patient registration
- Business profile — clinic logo, name, and contact info displayed
- Send status — messages are queued and sent from your own number
- PDF attachments — send prescriptions and invoices as PDFs
- Sender identity — all messages show "Clinic Name | Phone Number"
- Admin credit management — admin can manually add/remove credits, toggle WhatsApp ON/OFF, view balance per clinic
- Razorpay — PENDING (blocked on bank account). Roadmap: open bank account → KYC → API keys → auto-credit top-up, buy credits button, plan upgrades
- Configure — Settings → WhatsApp
PRO TIP
WhatsApp messages have a 98% open rate vs 20% for email. Start with the free credits included in your plan, then top-up as needed. The ₹249/200msg pack is the best value for most clinics. Use the per-clinic toggle in Settings to control WhatsApp for each clinic location.
How Reminders Go Out
Appointment confirmations, reminders and payment follow-ups are sent over WhatsApp, SMS and email. Each channel respects the patient’s own opt-out flag, so a patient who has opted out of one still receives the others.
📱
WhatsApp
Templates in 20 languages, sent from your own number. Free allowance per plan, then top-up packs.
📩
SMS
TRAI DLT-compliant templates for clinics that prefer SMS or have patients not on WhatsApp.
📧
Email
Automated daily reminders at 08:00 IST, plus payment follow-ups and receipts.
📋
Logged
Every message is recorded on the patient’s timeline, so anyone at the desk can see what was already sent.
A Note on Voice Calls
Automated voice calls are not a patient-facing feature. Dentospire uses voice calling only for its own outreach to clinics — onboarding and account alerts — and never for patient reminders, recall or satisfaction follow-ups. Those go over WhatsApp, SMS or email, which are opt-out aware and leave a written record the patient can re-read.
How It Works
1
Open Greetings
Go to Communication → Festival Greetings. Browse 51 professionally designed templates.
2
Choose Festival
Templates for Diwali, Holi, Eid, Christmas, Navratri, Ganesh Chaturthi, Independence Day, Republic Day, Raksha Bandhan, Makar Sankranti, Pongal, Onam, and many more.
3
Auto-Branded
Each card automatically includes your clinic name, logo, doctor name, and contact info. No manual editing needed.
4
Share
Download the card image or share directly via WhatsApp, email, or social media. Send to individual patients or broadcast to all.
Festival Coverage
- Hindu festivals: Diwali, Holi, Navratri, Ganesh Chaturthi, Dussehra, Janmashtami, Makar Sankranti, Ram Navami, and more
- Muslim festivals: Eid ul-Fitr, Eid ul-Adha, Milad un-Nabi
- Christian festivals: Christmas, Easter, Good Friday
- National days: Independence Day, Republic Day, Gandhi Jayanti
- Professional: Doctors Day, Dentist Day, Women's Day, Teacher's Day
PRO TIP
Festival cards are a
free marketing tool. Patients remember clinics that wish them on festivals. Set up auto-send to reach all patients automatically.
The Dentospire Points programme has been retired. New activity no longer earns points and there are no point rewards or Pro upgrades to redeem. Your clinic data is unaffected. Patient loyalty cards are a separate feature and continue to work as before.
Creating a Quotation
1
Open Quotations
Navigate to Quotations in the sidebar. Click New Quotation.
2
Select Patient
Search and select the patient. Their details auto-fill on the quotation.
3
Add Treatments
Add proposed treatments with fees, tooth numbers, and descriptions. GST auto-calculates based on your settings.
4
Generate PDF
Download a professional, branded quotation PDF. Share with the patient via WhatsApp or email for approval.
5
Convert to Treatment
Once the patient approves, convert the quotation directly into treatment records and invoices.
Quotation vs Invoice
- Quotation: An estimate shared before treatment begins. Not a bill.
- Invoice: A formal bill generated after treatment is performed.
- Quotations help patients understand costs upfront and decide on treatment plans.
PRO TIP
Always give patients a quotation before expensive procedures. It builds trust and reduces payment disputes. Look for the
ℹ️ info icon for help.
What are Interest Lists?
Interest Lists let you group patients who share a common interest or need — such as “Interested in Implants”, “Teeth Whitening Prospects”, or “Orthodontics Enquiries”. Use these lists for targeted follow-ups and marketing.
1
Create a List
Go to Interest Lists in the sidebar. Click New List and name it (e.g., “Implant Interested”).
2
Add Patients
Add patients to the list from their profile or from the interest list page. One patient can belong to multiple lists.
3
Follow Up
View all patients in a list. Track which ones have been contacted, scheduled, or converted to treatment.
4
Targeted Communication
Send emails or messages to an entire interest list. Perfect for announcing new services or special offers.
PRO TIP
When a patient asks about a service but isn't ready to commit, add them to an interest list. Follow up in 2–4 weeks. Converts enquiries into treatments.
Managing Salaries
1
Open Salary Module
Go to Clinical → Salary. View all staff members with their salary details.
2
Set Salary
Configure monthly salary for each staff member. Set payment date and payment method.
3
Record Payment
When salary is paid, record the payment with date, amount, and payment mode (Cash/GPay-UPI/Card/Bank Transfer).
4
Payment History
View complete payment history for each staff member. Track partial payments, advances, and deductions.
Features
- Monthly tracking — salary status for current and past months
- Payment modes — Cash, GPay-UPI, Card, Bank Transfer
- History — complete payment trail for each staff member
- Integration — salary expenses appear in Finance → Expenses
PRO TIP
Record salary payments promptly. The expense integration means your financial reports automatically include staff costs. Look for the
ℹ️ info icon for help.
Visiting Doctor Workflow
1
Add Visiting Doctor
Go to Settings → Doctors. Add visiting specialist with their name, degree, specialization, and visiting schedule.
2
Assign Patients
When a patient needs specialist care, assign them to the visiting doctor. The specialist can view the patient’s history and chart.
3
Share Treatments
Treatment records created by visiting doctors are linked to the main clinic. Revenue and billing stay unified.
4
Separate Profiles
Each visiting doctor has their own profile with degree, specialization, and social links. Appears on invoices and prescriptions they create.
Use Cases
- Orthodontist visits your clinic twice a month — all braces cases routed to them
- Oral surgeon handles complex extractions and implants on specific days
- Endodontist manages RCT cases with their own treatment notes
- Prosthodontist handles crown, bridge, and denture cases
PRO TIP
Visiting doctors can have their own login. They see only their assigned patients. All billing goes through your clinic.
Settings Sections
🏢
Clinic Profile
Clinic name, address, phone, email, logo, GST number. Appears on all invoices, prescriptions, and PDFs.
👩
Doctor Profiles
Add/edit doctors with name, degree, registration number, specialization, photo, and social media links.
🦷
Procedures & Fees
Manage your treatment procedure list with fees. Set GST rates per procedure. Import/export procedure lists.
📅
Appointment Settings
Working hours, slot duration, chair count, booking rules, and Google Calendar sync. Connect using your clinic's dedicated Gmail — one calendar per clinic.
🔒
Staff & Permissions
Add staff members, assign roles, set 10 granular permission keys (see Chapter 23).
✉
Communication
Configure email automation, review requests, festival greetings, notification preferences, and WhatsApp API ON/OFF toggle (per-clinic). View WhatsApp credit balance and purchase top-up packs. Admin can manually add/remove credits per clinic.
🔬
Lab Settings
Add labs, set rate lists, configure auto-billing preferences and monthly report generation.
🌐
Language
Switch between 13 supported languages (see Chapter 35). Applies to the entire interface.
Multi-Currency Support
1
Set Clinic Currency
Go to Settings → Clinic Profile. Select your clinic currency from the dropdown. Dentospire supports 42 countries with their local currencies.
2
Automatic Updates
Once set, all invoices, quotations, treatment fees, salary records, and financial reports display amounts in your selected currency symbol.
3
PDF Branding
Downloaded invoice PDFs, quotation PDFs, and prescription PDFs all show the correct currency symbol for your country.
PRO TIP
Complete your
Clinic Profile and
Doctor Profiles first — this information appears on every PDF you generate. Set your currency in Settings to ensure all financial documents display correctly. Look for the
ℹ️ info icon on every settings page for guidance.
Creating Backups
1
Go to Settings → Backup
Access the backup section from clinic settings.
2
Create Backup
Click Create Backup. The system exports all your clinic data — patients, treatments, invoices, appointments, notes, and more.
3
Download Encrypted File
Your backup is encrypted with AES-256-GCM (military-grade encryption). Download the encrypted file to your computer.
Restoring Data
1
Upload Backup File
In Settings → Backup, click Restore. Upload your encrypted backup file.
2
Verify & Restore
The system decrypts and validates the backup. Preview what will be restored before confirming.
Security
- AES-256-GCM encryption — same standard used by banks and military
- Your data, your control — backup files are only accessible to you
- Cloud database — Neon PostgreSQL with automatic daily backups
- No data loss — even if you switch devices, your data is safe in the cloud
PRO TIP
Create a backup monthly and store it on Google Drive or an external hard drive. Your cloud data is always safe, but local backups give extra peace of mind.
Supported Languages
🇨🇳
English
Default language. Full interface support.
🇮🇳
Hindi
हिंदी — essential for 60% of Indian dentists who prefer Hindi.
🇮🇳
Marathi
मराठी — for Maharashtra-based clinics.
🇮🇳
Tamil
தமிழ் — for Tamil Nadu clinics.
🇮🇳
Telugu
తెలుగు — for Andhra Pradesh and Telangana.
🇮🇳
Kannada
ಕನ್ನಡ — for Karnataka clinics.
🇮🇳
Gujarati
ગુજરાતી — for Gujarat clinics.
🇮🇳
Bengali
বাংলা — for West Bengal clinics.
Also Supported
- Malayalam — for Kerala clinics
- Punjabi — for Punjab clinics
- Odia — for Odisha clinics
- Urdu — for Urdu-speaking communities
- Assamese — for Assam clinics
- Spanish, Arabic, Portuguese, French — for global clinics
- Indonesian, Turkish, Thai — for Southeast Asia & Middle East
1
Change Language
Go to Settings → Language or click the language selector in the sidebar. Select your preferred language. The entire interface updates instantly.
2
Multi-Language Voice Input
All microphone buttons across the system now support 20 languages (13 Indian + 7 international). Speak in Hindi, Marathi, Tamil, or any supported language — AI automatically translates your speech to proper English clinical text.
PRO TIP
60% of Indian dentists prefer their regional language over English. Switch to Hindi or your state language for a more comfortable experience. Your staff will thank you!
ℹ️ INFO BUTTONS — ON EVERY PAGE
Look for the
ℹ️ info icon on every page in Dentospire. Click it for instant, contextual help about that page's features. No need to search documentation — help is always one click away.
24/7 AI Support
Dentospire™ Support
Hi! I’m the Dentospire™ AI assistant. Ask me anything!
How do I create an invoice?
Go to patient profile → Billing → Create Invoice. Add items, GST, save. Download as PDF!
DENTOSPIRE™
1
Chat Icon
Bottom-right corner of any page.
2
Ask
How do I create an invoice? How to sync Calendar?
3
Answers
AI knows every feature. 24/7.
Mobile (PWA)
1
Install
Open dentospire.com on phone. Add to Home Screen.
2
Native
Full-screen, fast. Android + iPhone.
3
Offline
View records without internet.
More Features
✉
Email Automation
Daily reports, appointment reminders, payment follow-ups — all automatic.
📄
Consent Forms
12 templates. Patient + doctor e-signatures. Download PDF.
👨
Multi-Doctor
Separate profiles, degrees, specializations, social links per doctor.
🔒
Staff Permissions
10 permission levels. Control what receptionist or assistant sees.
🎉
Festival Greetings
51 templates for every Indian festival. Branded with your clinic logo.
📊
AI Analysis
Smart Analytics, Health Score, AI Growth — 4 tabs of AI-powered insights.
📤
CSV/Excel Export
Export patients, invoices, treatments, reports — one click.
💵
Daily Collection Report
Finance → Collection tab. View every payment by day/month/year with treatment name, payment mode & totals. Export CSV.
📍
Patient Filters
Filter patients by Town/Area and Treatment type simultaneously. Active badges show applied filters. Voice search supported.
🧠
AI Correction Capture
Edit an AI suggestion? Click “Report correction” — AI extracts a clinical rule and learns for future suggestions. PHI-free.
📅
Appointment Delete
Click any appointment card to open details. Delete with one tap. Google Calendar syncs automatically.
Free
₹0
forever
- 200 patients
- Dental charting
- SOAP notes
- Billing
- Appointments
- Self-booking
- Prescriptions
- No WhatsApp API
Starter
₹7,497
per year
- Unlimited patients
- Everything in Free
- 200 WhatsApp/mo free
- Google Calendar
- Email automation
- Lab management
- Reports
- Top-up packs available
Pro
₹14,997
per year
- Everything in Starter
- 1,000 WhatsApp/mo free
- AI X-ray
- Voice-to-SOAP™
- AI Autosuggest™
- 13 language templates
- 50 AI/day
- Community
Enterprise
₹29,997
per year
- Everything in Pro
- 5,000 WhatsApp/mo free
- Multi-branch
- Unlimited AI
- Custom branding
- Priority support
- Migration
- API
Why Free?
- No credit card
- No time limit
- 200 patients
- Full charting
- Upgrade anytime
PRO TIP
Starter
₹625/month — less than paper registers.
Need Help?
Free 15-min demo with founder (a dentist!).
dentospire.com/contact | contact@dentospire.com
Start a Visit from the Queue
1
Open Queue Page
Navigate to the Queue page from the sidebar. You will see all patients currently in the waiting queue with their check-in time and status.
2
Click "Start Visit"
On any patient row in the queue, click the Start Visit button. This instantly opens Quick Mode for that patient.
3
Treat in Quick Mode
Quick Mode opens with the patient pre-loaded. Add procedures, record SOAP notes, prescribe medicines, and collect payment — all in one screen.
4
Complete & Return
When done, the patient is automatically removed from the queue. The visit summary is generated and you return to the queue for the next patient.
PRO TIP
This eliminates the old workflow of manually navigating to a patient profile, then opening Quick Mode. One click from the queue does it all.
Reading the Four Figures
1
First visit
The patient’s first visit ever — however long ago they registered. It does not mean “registered today”, which is why it can differ from the list of today’s registrations in Quick Mode.
2
Returning
Seen by your clinic before today.
3
Visited today
Counts patients. The strip beside it counts visit records, so the two differ whenever somebody is seen twice in a day.
4
Appointment
Patients whose visit was recorded against a booking. It reads zero when visits are recorded through Quick Mode or Record Visit, because those do not attach one — the card says so rather than leaving you to wonder.
Open and Done
1
Open
Still to do — in the chair, waiting, or registered today with no visit yet.
2
Done
Finished — a visit was recorded, or the appointment was a no-show or cancelled. Finished rows are labelled First visit or Returning beside the visit number, so you can see at a glance who was new today.
How It Works
1
Complete a Treatment
When you mark any treatment as Completed, Dentospire automatically shows a "Collect Payment?" prompt.
2
Choose Payment Method
The prompt shows the treatment fee and lets you select the payment method: Cash, GPay-UPI, Card, or Bank Transfer.
3
Record or Skip
Click Collect to record the payment instantly, or Skip if the patient will pay later. Either way, the treatment status updates.
PRO TIP
This ensures no payment is forgotten after completing a procedure. The prompt appears in both Quick Mode and the full treatment view.
What the Visit Summary Shows
1
Automatic Generation
After completing a patient visit from the Queue, a green Visit Summary card appears automatically showing everything done during that visit.
2
Procedures & Teeth
Lists all procedures performed, the teeth treated, and procedure fees.
3
Payment Details
Shows total amount, amount paid, and payment method used. Instantly see if there is any remaining balance.
4
Prescriptions
Any prescriptions generated during the visit are listed in the summary card for a complete overview.
PRO TIP
The Visit Summary gives you and your receptionist a complete snapshot of what was done, what was charged, and what was prescribed — all at a glance.
Editing Lab Records
1
Open a Lab Record
Navigate to Lab from the sidebar. Click any lab record to open its details.
2
Edit Fields
All fields are now editable: lab name, test type, charges, date, findings, and status. Click Save to update.
Patient ↔ Lab Two-Way Sync
1
Changes Sync Both Ways
When you edit a lab record, the changes automatically reflect on the patient's timeline. Similarly, lab records created from the patient profile appear in the Lab section.
2
Send to Lab from Treatment
On any treatment row, click the "Send to Lab" icon. This creates a lab work order pre-filled with the patient name, treatment details, and tooth numbers.
PRO TIP
Two-way sync means you never have to update data in two places. Change it once — it updates everywhere.
How AI Bill Archive Works
1
Open the Bills Page
Navigate to Bills from the sidebar. You will see three tabs: Lab, Material, and Other — for organizing all clinic expenses.
2
Upload a Bill Photo or PDF
Click Add Bill. Upload a photo (JPG, PNG, WebP) or PDF of any bill — lab bills, material invoices, or miscellaneous expenses.
3
AI Auto-Scan
Dentospire AI reads the bill and extracts: vendor name, item description, amount, date, and category. All fields auto-fill.
4
Expense Auto-Created
An expense transaction is automatically created in your finance records. No manual data entry needed. Review and confirm if needed.
AI POWERED
Uses 3-tier AI fallback (Gemini → Groq → Claude) for maximum reliability. Works with handwritten bills, printed invoices, and PDF documents.
What Changed
1
Same Layout for Add & Edit
The Add Procedure and Edit Treatment forms now use the exact same layout, fields, and styling. No confusion between the two views.
2
Discount Toggle
Both forms include a discount toggle that lets you switch between ₹ flat amount or % percentage discounts. The final amount updates in real-time.
3
Smart Status Detection
Treatment status (Planned / In Progress / Completed) is auto-detected based on payment and clinical progress. Manual override is always available.
PRO TIP
The unified form means your staff learns one interface for both adding and editing treatments — faster training, fewer mistakes.
Navigating the Bills Page
1
Three Tabs
The Bills page has three tabs: Lab (lab bills and work orders), Material (inventory and supply invoices), and Other (rent, utilities, miscellaneous).
2
Upload & Scan
Each tab supports photo/PDF upload with AI Auto-Scan. The AI extracts vendor, amount, date, and description from the uploaded document.
3
Track All Expenses
View all your clinic expenses in one place. Filter by date range, search by vendor name, and export to CSV.
PRO TIP
Use the Bills page alongside the Finance section for a complete picture of your clinic's income and expenses.
Adding Suppliers
1
Manual Add
Go to Suppliers → click Add Supplier. Enter the supplier name, phone, email, and address manually. Save to add them to your directory.
2
Email Invite
Click Invite via Email on any supplier. An invitation email is sent with your clinic details and a link to connect.
3
WhatsApp Invite
Click the WhatsApp icon to send a pre-formatted invitation message to your supplier via WhatsApp.
PRO TIP
Use the WhatsApp invite for local suppliers who may not check email regularly. It opens their WhatsApp with a ready-to-send message.
Using Watchlists
1
Add to Watchlist
On any patient profile, click the Watchlist button. Select a category (e.g., "Follow-up needed", "VIP", "Pending treatment") or create a new one.
2
View by Category
Navigate to the Watchlist section to see all categories — even empty ones (shown dimmed with (0)). Click any group to expand and view the patients.
3
Edit a Category
Click the Edit icon on any category to change its name, color, or description. Updates apply instantly across every patient in that list.
4
Quick Actions
From the watchlist view, quickly call, message, or open any patient profile. Remove patients from a category when their status changes.
PRO TIP
Use watchlists to track patients who need follow-up calls, those with incomplete treatments, or VIP patients who deserve priority scheduling. Empty categories stay visible so you never forget a list you set up.
Using the AI Chatbot
1
Open the Chatbot
Click the chat icon in the bottom-right corner of any page, or use the "Ask Me" button in the sidebar.
2
Type or Speak (10 Languages)
Type your question, or click the mic icon to speak in any of 20 languages (13 Indian + 7 international). AI translates your speech to proper English clinical text automatically.
3
Get Step-by-Step Guidance
The chatbot has 15+ detailed feature guides built in. Ask "How do I create an invoice?" or "How to set up lab management?" and get precise step-by-step walkthroughs.
4
Clinical Protocol Help
Ask about clinical protocols for caries, RCT, extraction, scaling, crown, implant, or ortho and get evidence-based treatment steps and prescription suggestions.
5
Natural Language Actions
Use conversational commands: "Find patient Rahul", "Show treatment history for Priya", "What's my revenue this month?", "Give me a patient summary", "Which bills are still unpaid?".
6
Smart Conversation Memory
The chatbot remembers context across long conversations (up to 14 messages with summary compression), so you can have natural multi-turn discussions without repeating yourself.
AI POWERED — DEEP KNOWLEDGE
The chatbot uses your clinic's RAG knowledge base (10 chunks per query, dental synonym expansion across 16 groups) for personalized answers. Every plan uses the same multi-provider AI chain. Your plan sets how many AI queries you get per day — Free 3, Starter 10, Pro 50, Enterprise unlimited — not which model answers. Race condition fixes and stream timeout ensure reliable responses under load.
Enhanced Voice Correction
1
50+ Dental Terms
Voice dictation now recognizes 50+ dental-specific terms including: amalgam, composite, endodontic, periodontal, gingivectomy, apicoectomy, and many more.
2
Auto-Correction
When you speak "endo dontic", the AI corrects it to "endodontic". Common mispronunciations and speech-to-text errors are automatically fixed.
3
Works Everywhere
Enhanced correction applies to all 20+ mic buttons across the system — SOAP notes, patient forms, search, and clinical notes.
4
Multi-Language Voice Input
Every mic button now has a language selector dropdown supporting 20 languages (13 Indian + 7 international). Speak in Hindi, Marathi, Tamil, Telugu, Kannada, Malayalam, Bengali, Gujarati, Punjabi, or Urdu — AI translates your speech to proper English clinical text automatically.
Multi-Provider AI Redundancy
1
Gemini (Primary)
Google Gemini handles AI requests first. Fast and capable for most tasks.
2
Groq (2nd Fallback)
If Gemini is rate-limited or unavailable, Groq AI takes over automatically. Ultra-fast inference.
3
Claude (3rd Fallback)
If both Gemini and Groq are unavailable, Claude Haiku handles the request. Multiple providers run in parallel, so one being slow or rate-limited does not stop you.
ZERO DOWNTIME
Several AI providers are called at once and the first usable answer wins, so a slow or rate-limited provider never leaves you waiting. This happens automatically and invisibly.
Finding Procedures Instantly
1
Open Add Procedure
Open a patient's profile → Treatments tab → Click "+ Add Procedure" to open the procedure picker dialog.
2
Type to Search
Start typing any procedure name in the search box at the top. The list filters instantly as you type — no need to scroll through hundreds of procedures.
3
Select a Procedure
Click any matching procedure to add it. The fee auto-populates from your Treatment Catalog settings.
4
Add Custom Procedures
If the procedure you need isn't in the default list, type the custom name and click "Add Custom". Set the fee manually — the custom procedure is available for this treatment immediately.
PRO TIP
Customize your default procedure list and fees in Settings → Treatment Catalog. Your top 5 most-used procedures appear as favourites at the top of the picker for one-click access.
Converting Quotations to Invoices
1
Open an Accepted Quotation
Go to Sidebar → Quotations → Find and open a quotation that has been accepted by the patient.
2
Click "Convert to Invoice"
Click the "Convert to Invoice" button at the top of the quotation. All line items, procedures, fees, discounts, and patient details are automatically pre-filled into a new invoice.
3
Review and Save
Review the auto-created invoice — all amounts, taxes, and patient info are carried over. Make any final adjustments if needed, then save.
4
Record Payment
Once the invoice is created, record the payment (Cash/GPay-UPI/Card/Bank Transfer) directly on the invoice page.
PRO TIP
You can also use "Convert to Treatment" if you want to create treatment records instead of just an invoice. Both options pre-fill all details automatically from the quotation.
How to Use
1
Press Ctrl+K
From any page in Dentospire, press Ctrl+K (or Cmd+K on Mac) to open the global search palette.
2
Type Patient Name, ID, or Phone
Start typing — results appear instantly with 300ms debounce. The search queries your database in real-time, showing matching patients with their name, ID, and phone number.
3
Click to Open
Click any result to jump directly to that patient's profile. Press Escape to close the search palette.
PRO TIP
Ctrl+K works from
any page — dashboard, appointments, finance, anywhere. No need to navigate to the Patients page first.
Available Shortcuts
⌨
Ctrl+/
Open the keyboard shortcuts cheatsheet overlay. Shows all available shortcuts in one place.
🔍
Ctrl+K
Global patient search. Find any patient by name, ID, or phone from any page.
🎤
Ctrl+Shift+V
Activate voice commands. Speak natural language commands like "Find patient Rahul" or "Go to appointments".
⎋
Escape
Close any open modal, dialog, search palette, or overlay.
PRO TIP
Press
Ctrl+/ anytime you forget a shortcut. The cheatsheet appears as an overlay and closes with Escape or clicking outside.
Repeat Last Prescription
1
Open Prescriptions Tab
Open a patient's profile → Prescriptions tab.
2
Click "Repeat Last Rx"
Click the "Repeat Last Rx" button. The system copies the patient's most recent prescription — all medicines, dosages, durations, and instructions are pre-filled into a new prescription.
3
Review and Save
Review the pre-filled prescription, make any adjustments, and save. Perfect for follow-up visits where the same medicines are prescribed.
Auto-Save Rx Drafts
Never Lose Work
- Prescription drafts auto-save every 30 seconds while you're editing
- If you navigate away accidentally or close the browser, your draft is preserved
- When you return to the prescription form, the saved draft is restored automatically
PRO TIP
Repeat Rx is especially useful for orthodontic patients on recurring medications. Combined with auto-save, you'll never lose a prescription mid-entry.
How It Works
1
Add a Medicine
While creating a prescription, click the Instructions field for any medicine.
2
Pick from Suggestions
A dropdown appears with 20 pre-written clinical instructions — "Take after food", "Apply topically on affected area", "Dissolve in lukewarm water and gargle", etc.
3
Click or Type Custom
Click any suggestion to auto-fill, or type your own custom instruction. All 8 built-in Rx templates have also been upgraded with precise instructions.
PRO TIP
These detailed instructions print on the patient's prescription PDF, ensuring patients understand exactly how to take each medicine.
Supported Languages
🇮🇳
Hindi
Speak naturally in Hindi — AI converts to clinical English.
🇮🇳
Marathi
Full Marathi voice support across all mic buttons.
🇮🇳
Tamil
Tamil voice input with AI translation to English.
🇮🇳
+ 17 More
Telugu, Kannada, Malayalam, Bengali, Gujarati, Punjabi, Odia, Assamese, Urdu, Spanish, Arabic, Portuguese, French, Indonesian, Turkish, Thai + English.
How It Works
1
Language Selector on Every Mic
Every microphone button in Dentospire — chatbot, SOAP recording, messages, and dictate buttons — now has a language selector dropdown. Select your preferred language before speaking.
2
Speak in Your Language
Speak naturally in Hindi, Marathi, Tamil, or any supported language. The system captures your speech accurately in the original language.
3
AI Translates to Clinical English
AI automatically translates your speech to proper English clinical text. Say "dard hai daant mein" in Hindi and get "Patient reports pain in tooth" in the clinical note.
4
Voice Command Aliases
50+ Hindi and Marathi voice command aliases are built in. Say "mera dashboard dikhao" or "patient list" in Hindi and the voice command system understands.
5
Right-Click to Cycle Languages
Right-click the voice command button (Ctrl+Shift+V) to quickly cycle through available languages without opening settings.
AI FEATURE — MULTI-LANGUAGE VOICE
AI translation ensures all clinical records are maintained in English for consistency, while letting doctors speak in whatever language is most comfortable. Works on ALL 20+ mic buttons across the system.
Start Your Free Trial Today
Start free for up to 200 patients — no credit card, no trial expiry.
Get Started Free →dentospire.com • dentospire@gmail.com
New Capabilities
🪥
Periodontal Charting by Voice
Speak the pockets while you probe — 32 teeth × 6 sites, charted as you say them, no second person writing numbers. Open a note, set its type to Periodontal. See Chapter 58.
📷
Chairside X-Ray Bridge
Your sensor’s capture files itself against the right patient — no export, no rename, no upload. Images land in Imaging.
📱
WhatsApp Booking Agent
Patients book themselves on WhatsApp after hours, on your own number. Clinical questions are handed to a person, never auto-answered. Settings → Profile.
📉
Revenue Leak Report
Names the actual unpaid invoices and the patients who quietly stopped coming — measured from your records, not estimated. Finance → Leaks.
🌐
Your Clinic’s Own Website
A real web page at your own address, edited from the same screen you run the clinic from. Sidebar → Website.
💳
Ortho & Payment Plans
Split a long case into monthly amounts that advance on their own, so a paying patient never lands on your overdue list.
🖼
Smart Scan for Paper Records
Photograph an old case sheet and the fields come back filled in. Nothing saves until you confirm — misread handwriting is worse than no record. Patients page.
📊
Tally & GST Export
One Tally Sales voucher per invoice in standard XML (no Tally account needed), plus a GSTR-1 report. GSTR-3B is not generated. Finance → Collection.
📤
Move Your Old Data In
Upload your old software’s CSV/Excel export, map columns, preview exactly what will land, then commit. Settings → Migration.
Auto-Bill Completed Treatments
An optional per-clinic switch in Settings → Billing, off by default. Turn it on and marking a treatment complete raises its invoice on the spot, instead of waiting for someone to tap “Generate invoice”. Zero-cost lines (free reviews, warranty redos) are skipped, and work already on a bill is never billed twice. Only doctors and admins can change it — clinics that prefer to bill by hand simply leave it off.
™ Dentospire, Voice-to-SOAP™, AI Case Publisher™, AI Autosuggest™, Voice Registration™, Quick Upload™, Smart Alerts™, Chart-to-SOAP™, Voice Search™, Quick Mode™, and Patient Self-Booking™ are trademarks of Dentospire.
Opening the Chart
1
It lives on a Periodontal note
Open the patient → Clinical → New Examination, then set the note type to Periodontal. On a SOAP or Dental Exam note there is no perio chart — that is the usual reason someone cannot find it.
2
Expand it
The chart is collapsed by default so it does not push everything else off the screen. Its header shows how many of the 192 sites are filled and when it last saved.
3
Press “Chart by voice” once
It keeps listening until you press Stop. A line under the button shows what the chart actually wrote, site by site, so a jump to the wrong tooth is obvious straight away. “How to use” beside it lists every command.
What to Say
1
Depths
Single digits: “three two four” fills the next three sites and moves on, and it reads the tooth back to you once all six are done. Clinical phrasing works too — “pocket depth three two four”.
2
Move around
“tooth one eight”, “at 36”, “next tooth”, “back”.
3
Fix a reading
“correct that four” overwrites the one you just gave. To land on an exact site: “buccal four”, “mesial buccal five”, “distal palatal three”.
4
Beyond pocket depth
“bleeding” flags the site just filled. “missing” marks the whole tooth. “recession two” after a reading. “mobility grade two” (Miller 0–III) and “furcation one” (Glickman 0–III). “repeat” reads the tooth back.
What It Works Out For You
1
CAL is never typed
Clinical attachment level is pocket depth plus recession, calculated per site and shown read-only. A 4 mm pocket with 2 mm of recession is 6 mm of attachment lost — that is the number that drives the diagnosis.
2
The figures for your note
Mean PD, mean CAL, BOP percent, sites at 4 mm or deeper, and counts of mobile, furcation-involved and missing teeth. BOP is a percentage of the sites you have charted, not of all 192, so a part-finished chart reports honestly.
3
It saves itself
There is no Save button for the chart — every reading is written as you go, so an interruption cannot lose the run. The one-line summary reaches your examination findings only when you press Apply to notes, and it is added to what you wrote rather than replacing it.
Two Things It Refuses On Purpose
Conversation never charts. If what you said sounds like ordinary speech rather than a run of readings, the whole utterance is discarded. Talking to your patient can never put a measurement in their record — which is why a sentence sometimes charts nothing, and that is the tool working, not failing.
“At 15” stays a reading. 15 is both a valid pocket depth and a real tooth, so it will not guess. Say “tooth one five” to move there.
No AI model touches the depths. It is a fixed grammar, so an unclear noise can never be turned into a plausible number. Every box stays typeable — voice is an accelerator on a chart that works perfectly well without it.
How a Patient Gets In
1
They sign in with an OTP
The patient goes to /patient-portal and receives a one-time code on their phone. No password to remember, nothing for your desk to issue or reset.
2
Thirteen pages
Appointments, book an appointment, treatments, prescriptions, invoices, payments, imaging, photos, consent forms, education videos, profile and feedback.
What It Can and Cannot Do
1
Read and request only
Nothing in the portal is editable clinical data. A patient cannot change a treatment, a note or an invoice.
2
Requests come to you
Anything the patient submits — a booking request, a feedback form — arrives on the clinic side for your staff to accept or decline. It never writes straight into the record.
Why It Is Built This Way
A portal that let patients edit their own clinical record would be worthless as a medico-legal document. Read-and-request keeps the record yours while still saving your desk the phone calls.
Publishing
1
Open Website
Sidebar → Free Website, or go to /website.
2
Edit and publish
Change the content and publish from the same screen. No separate website builder, no agency, and no waiting on someone else to make a change.
3
Unpublish any time
Publish, edit and unpublish all live on that one page.
No Second System
Your clinic details, timings and contact number are already in Dentospire. The website reads from the same place, so it cannot drift out of date the way a separately-built site does.
Using It
1
Open Education
Sidebar → Education, or /education. Nine categories, including 16 3D procedure animations.
2
It suggests itself
The library auto-suggests videos from the patient’s own treatments, so you are not searching for the right one mid-consultation.
3
Send it home
Share by SMS, and the same videos appear in the patient’s portal. Care instructions by diagnosis are there too.
Where It Earns Its Keep
Explaining a root canal for the fourth time in a day is time you do not have. A 3D animation does it once, correctly, and the patient can watch it again at home — which is usually when the questions actually arrive.
Pain Triage
1
The patient submits symptoms
A patient in pain fills in a short patient-facing form at /triage/<clinicId>.
2
You see a prioritised queue
The clinic gets a triage list ordered by urgency, rather than a phone call your receptionist has to grade on the spot.
Chairside Sessions
1
Capture at the chair
Notes and images are captured during the appointment.
2
The doctor approves before it lands
The approval screen at /chairside/<sessionId> is where the doctor reviews and accepts what was captured. Nothing reaches the patient record until then.
Nothing Auto-Writes
Both surfaces stage what they collect. A patient’s own description of their pain, and anything captured at the chair, becomes part of the clinical record only after a clinician has looked at it.
Setting One Up
1
From the billing dialog
When you raise the bill for a long treatment, split it into monthly amounts.
2
It advances on its own
Each instalment comes due on schedule without anyone re-billing it.
What This Fixes
1
Paying patients stop looking like defaulters
A patient paying to plan never appears on your overdue list.
2
Real defaulters still surface
A genuinely missed instalment still shows. You keep the signal and lose the noise.
Why It Matters for Ortho
An 18-month ortho case billed as one invoice sits on your outstanding report for 18 months and drowns out the patients who genuinely owe you money.
Importing
1
Open Migration
/settings/migration. Bring a CSV or Excel export from your previous system.
2
Map the columns
Tell it which column is which. Nothing is assumed from the file’s headings.
3
Preview, then commit
See exactly what will land before anything is written.
Failures Are Reported, Not Swallowed
Rows that fail validation are skipped and listed for you. A silent import that drops 40 patients without saying so is worse than one that refuses them out loud. No scheduling and no waiting on support — you run it when it suits you.
Common Answers
1
A page says “upgrade”
That feature is on a higher plan. Check /plans.
2
A patient does not appear in search
They may be soft-deleted, or they belong to another branch — check the branch switcher.
3
An invoice will not accept a payment
It may already be fully paid. The overpayment dialog explains the difference.
4
AI replies stop working mid-day
The plan’s daily AI quota is spent. It resets tomorrow.
Less Obvious Ones
1
An uploaded document is not used in answers
The knowledge base is Pro and above, and only 10 documents can be active at a time.
2
A staff member cannot see a page
Check their 11 permission toggles at Settings → Team.
3
Voice input does nothing
Voice needs Chrome or Edge, and microphone permission.
4
Two pages show different numbers
Check the date range. Several reports use a rolling 30-day window rather than the calendar month, so they will legitimately disagree with a month-to-date figure.
Still Stuck?
Ask DARA from inside the app — it knows the current feature set and can give you the exact route. WhatsApp support is on the number at the foot of every page.